Methods To Change Windows Network Profiles Between Public and Private
Windows OS provides a lot of functions and built-in tools to maintain security so that you can improve the security of your system by using them.
Similarly, when you use network sharing or connect to a wired or wireless network, there are two sets of default security and sharing profiles – “Public” and “Private”.
Private network settings are mainly used in the home and Office, while public networks are everywhere in the public domain.
You also need to know that how Windows PC treats public and private networks differently. On Windows, switching network profiles is important for both security and performance. By changing network profiles properly as per the need, you can block unauthorized access to your system. Understanding how to manage these settings can optimize your system security and network performance.
If you are new to network settings or want to know about switching network profiles, we will walk you through the process of changing network profiles between public and private.
What is a network profile on Windows?
If your search purpose is to know how to change between public and private network profiles on Windows PC, you can jump straight to the topic.
But in our opinion, you should first know what a network profile is on Windows. After understanding this, you will be able to configure these settings at the right time as needed.
Switching network profiles is more than just a simple settings adjustment when you are connecting to different networks with your device. Network profiles in Windows determine how your PC interacts with the network you choose.
There are mainly two types of network profiles on Windows that you can choose according to your choice.
- Public Network Profile: As the name suggests, the public network is ideal for use in public places like cafes, airports and hotels. For security purposes, this setting hides your PC from the network so that other devices cannot see and access it.
- Private Network: This network profile is best for a trusted environment like your home or office. Enabling this profile makes it easier for other devices that are using the same network to discover your PC.
This is why the Private network profile is preferred for configuring network sharing, which enables file sharing, printer access and other network-related activities.
When Windows detects and connects to a new network, it asks you if you want to allow your PC to be discovered by other PCs and devices on the same network. If you choose yes, it will treat the network as private. If not choose no, it will remember it as public. Remember, you are allowed to
Importance Of Switching Network Profile
Selecting the right network profile is very important for the security of your system. By enabling the appropriate network settings, you can decide whether your device is visible or not to others on the current network.
For example, if you activate a private network profile on a public Wi-Fi, your files and data may be exposed to other people on the same network, which you would never want.
Similarly, if you set a trusted home network as public, your ability to share files and data on your device may be limited.
Therefore, it is important to select the right network profile so that you do not face any security issues.
Important Points:
- When the Public network profile is activated, these settings turn off network discovery by default so that the computer is not exposed to any services on other PCs and is not visible to other devices on the network.
- When you use a public profile, it disabled the file and printer sharing. But file sharing can be enabled in a private network by enabling network discovery.
- A public network is more secure than a private network.
How To Change Network Profile in Windows (Public vs. Private Network)
When your PC detects a new network, it always asks you to choose the type of network and settings you want to use. If you missed these settings or want to change your active network profile, you are allowed to switch it anytime.
On Windows PC, you have several ways to change your network profile to private or public. You can switch network profiles on Windows 11 & Windows 10 using the settings app, command prompt and by editing registry editor.
If you are looking for specific steps to change or configure network profiles on your Windows computer, read all the ways shared in this guide and choose one of them.
(A) Change Network Profiles On Windows 11 & Windows 10 Using Settings App
Method of network profile type selection is almost the same for both Windows 11 & Windows 10 OS-based systems. Here we are sharing the exact steps for the W11 system but you can do the same on your W10.
-
Change Network Profile Type For Ethernet Connection On W11 & W10 PC
Follow this method if your system is connected via Ethernet (wired) connection.
To Change Network Profile Type Using Settings App:
- Open the Windows Settings application on your Win 11 computer by pressing the “Win + I” shortcut key.
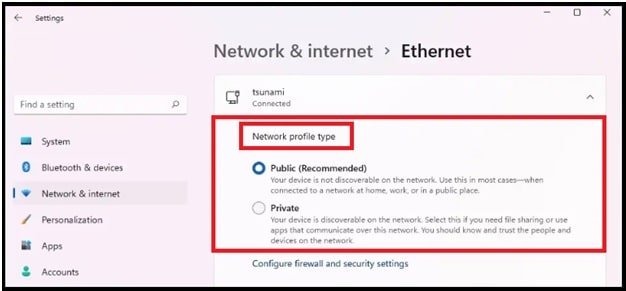
- Select the “Network & Internet” section >>> click the “Ethernet” section to expand its options.
- Now you will see the “Network Profile Type” section with two options: “Public” and “Private”.
Public: If you select this network type, you device is not discoverable in the local network. It’s suitable for home, work and public places.
Private: Your device will be discoverable in the local shared network. Use this network type on a trusted local area network to share files and other resources like printers.
In this way, you can successfully switch between private and public network types on a Windows 11 computer.
-
Change Network Profile Type For WIFI Connection On W11 & W10 PC
If your system is connected via wireless network, follow the steps and change active network profile type.
- Launch the Windows Settings app by pressing the “Win + I” keys on your keyboard.
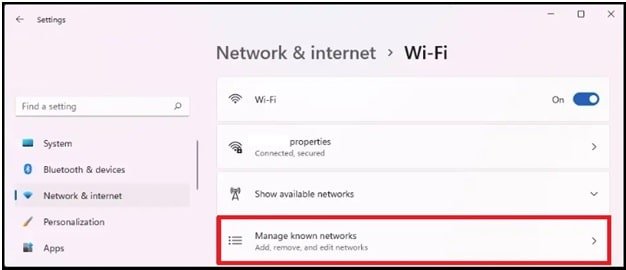
- Navigate to “Network & Internet” >>> click the “WIFI” section from the right sidebar to manage known networks.
- Find and click the “manage Known networks” option.
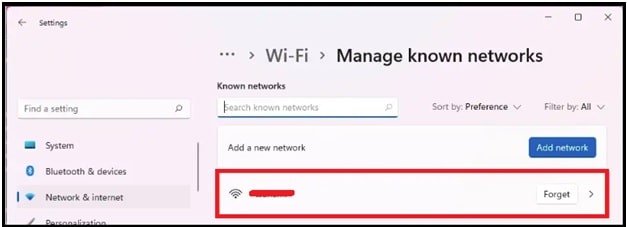
- Now you will see a list of wifi networks including active network. Just click the active wireless connection.
- Now you can choose “Private” or “Public” network from the “Network Profile Type” section.
- Done!!! Your selected network profile type will be applied on your connection.
(B) Advanced Methods for Switching Network Profiles
-
Change Network Profile In Windows To Private Using Powershell CMD
Windows users can also execute the network profile changing commands to perform this task. By using this method, you don’t need to navigate to different steps. Simply run the appropriate command via command window or PowerShell windows and it will set your desired network profile on your system.
To Make Network Private Or Public Using CMD:
- Run PowerShell as administrator on your Windows 11 laptop or PC.
- Execute the following PowerShell Command to verify the current network profile. Type the CMD and hit the enter key.
Get-NetConnefctionProfile
- Now check the result and confirm the network profile type in the “NetworkCategory” field.
- Now it’s time to set the new network profile type using the below command. Use the following command, modify it and then execute it by pressing the enter key.
Set-NetConnectionProfile -Name "NETWORK-NAME" -NetworkCategory TYPE
Modify The Command Before Execution:
Replace the NETWORK-NAME with the connection name and TYPE with the network profile type (Public or Private).
- After execution of the correct cmd, your selected network profile type will replace the existing one.
-
Change Network from Public to Private From Registry Editor (For W11 & W10)
You can also change or modify the Windows Registry editor values to set up the default network profile. Remember, changing values in Registry editor is an advanced users technique. Follow this method, if you are sure about it. One wrong step may curroupt your system. Also, we recommend you to backup registry before making changes.
- Press the “Win + R” to open run dialog box >>> type “regedit” in the text field and hit the enter key to open Windows registry editor.
- Copy the following path >>> paste it in the address bar of your registry editor and hit the enter key.
HKEY_LOCAL_MACHINE\SOFTWARE\Microsoft\Windows NT\CurrentVersion\NetworkList\Profiles
- Now select the “subkey” from the “profile” folder >>> confirm the “ProfileName” to know the network connection.
- Double-click the “Category” from the right pane >>> change the value data “0” for the public profile and 1 for Private profile type.
- Finally, click “OK” to save the changes and restart your PC for once.
As you change the values in the Registry Editor, your selected network profile will start working on your Windows computer.
Troubleshoot Common Network Profile Issues
Now you can see how it is to change network profile in a Windows PC or laptop (w11 & W10). But the problem is that sometimes, you may face unexpected issues like loss of connectivity or incorrect network detection. In that case, you can try the following troubleshooting tasks.
- Network Stuck on Public Profile: If any above method is not able to change a public profile that
means something is wrong in network settings. So, visit the “Network and Sharing Center” and enable the “network discovery” and “file sharing settings”. Check the detailed guide on “how to enable network discovery on Windows including file sharing settings”.
Incorrect profile assignment: Sometimes Windows may assign the network profile incorrectly due to unknown reasons. In such conditions, you can set the network profile manually using settings or PowerShell command.
Connectivity Issues After Switching Profile: Sometime, you may face network connection errors. There are several ways to fix this issue because causes may be different for different users. If nothing is working for you, we recommend you reset your network.
- Open the “Settings” app >>> select the “Network & Internet” section.
- On Windows 10, go to “Status” and click “Network Reset”. For Windows 11 OS, go to “Advanced network settings” and click “Network reset” button.
- Again click the “Reset Now” button to confirm your action and network settings will reset automatically.
CONCLUSION
Changing a network from public to private or private to public in Windows-based systems is a simple and step-by-step process. Just because it’s important for security, all Windows OS allows you to customize network settings to suit your preferences and needs.
But you should keep in mind that switching network profiles is essential to ensure the security and functionality of the device whether you are at home, office or using a public Wi-Fi.
Simply learn how to manage your network connection in Windows and secure your online presence.


